From inside (document excerpt):
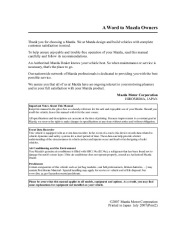
A Word to Mazda Owners Thank you for choosing a Mazda. We at Mazda design and build vehicles with complete customer satisfaction in mind. To help ensure enjoyable and trouble-free operation of your Mazda, read this manual carefully and follow its recommendations. An Authorized Mazda Dealer knows your vehicle best. So when maintenance or service is necessary, that’s the place to go. Our nationwide network of Mazda professionals is dedicated to providing you with the best possible service. We assure you that all of us at Mazda have an ongoing interest in your motoring pleasure and in your full satisfaction with your Mazda product.
User and Operator’s Vehicle Manual Guide. Free Auto PDF Manual Download. Years covered by this manual: 2008.
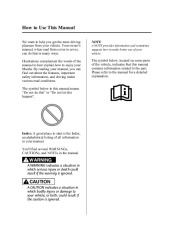
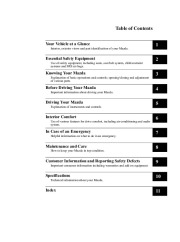
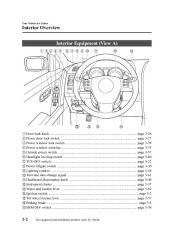
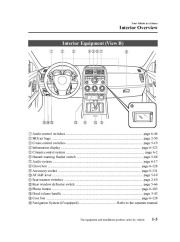
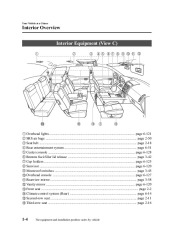
Mazda Motor Corporation HIROSHIMA, JAPAN Important Notes About This Manual Keep this manual in the glove box as a handy reference for the safe and enjoyable use of your Mazda. Should you resell the vehicle, leave this manual with it for the next owner. All specifications and descriptions are accurate at the time of printing. Because improvement is a constant goal at Mazda, we reserve the right to make changes in specifications at any time without notice and without obligation. Event Data Recorder This vehicle is equipped with an event data recorder. In the event of a crash, this device records data related to vehicle dynamics and safety systems for a short period of time. These data can help provide a better understanding of the circumstances in which crashes and injuries occur and lead to the designing of safer vehicles. Air Conditioning and the Environment Your Mazda’s genuine air conditioner is filled with HFC134a (R134a), a refrigerant that has been found not to damage the earth’s ozone layer. If the air conditioner does not operate properly, consult an Authorized Mazda Dealer. Perchlorate Certain components of this vehicle such as [air bag modules, seat belt pretensioners, lithium batteries, .] may contain Perchlorate Material Special handling may apply for service or vehicle end of life disposal. See www.dtsc.ca.gov/hazardouswaste/perchlorate. Please be aware that this manual applies to all models, equipment and options. As a result, you may find some explanations for equipment not installed on your vehicle. 2007 Mazda Motor Corporation Printed in Japan July 2007(Print2) How to Use This Manual We want to help you get the most driving pleasure from your vehicle. Your owner’s manual, when read from cover to cover, can do that in many ways. Illustrations complement the words of the manual to best explain how to enjoy your Mazda. By reading your manual, you can find out about the features, important safety information, and driving under various road conditions. The symbol below in this manual means “Do not do this ” or “Do not let this happen “. NOTE A NOTE provides information and sometimes suggests how to make better use of your vehicle. The symbol below, located on some parts of the vehicle, indicates that this manual contains information related to the part. Please refer to the manual for a detailed explanation. Index: A good place to start is the Index, an alphabetical listing of all information in your manual. You’ll find several WARNINGs, CAUTIONs, and NOTEs in the manual. WARNING A WARNING indicates a situation in which serious injury or death could result if the warning is ignored. CAUTION A CAUTION indicates a situation in which bodily injury or damage to your vehicle, or both, could result if the caution is ignored. Table of Contents Your Vehicle at a Glance Interior, exterior views and part identification of your Mazda. 11 Essential Safety Equipment Use of safety equipment, including seats, seat belt system, child-restraint systems and SRS air bags. Knowing Your Mazda Explanation of basic operations and controls; opening/closing and adjustment of various parts. Before Driving Your Mazda Important information about driving your Mazda. Driving Your Mazda Explanation of instruments and controls. Interior Comfort Use of various features for drive comfort, including air-conditioning and audio system. In Case of an Emergency Helpful information on what to do in an emergency. Maintenance and Care How to keep your Mazda in top condition. Customer Information and Reporting Safety Defects Important consumer information including warranties and add-on equipment. Specifications Technical information about your Mazda. Index 1 Your Vehicle at a Glance Interior, exterior views and part identification of your Mazda. Interior Overview Interior Equipment (View A) Interior Equipment (View B) Interior Equipment (View C) 1-2 1-2 1-3 1-4 Exterior Overview . 1-5 Front 1-5 Rear . 1-6 1-1 Your Vehicle at a Glance Interior Overview Interior Equipment (View A) Door-lock knob page 3-26 Power door lock switch . page 3-27 Power window lock switch page 3-39 Power window switches page 3-35 Outside mirror switch page 3-57 Headlight leveling switch page 5-60 TCS-OFF switch page 5-22 Power liftgate switch . page 3-30 Lighting control . page 5-58 Turn and lane-change signal page 5-61 Dashboard illumination knob page 5-40 Instrument cluster page 5-37 Wiper and washer lever . page 5-62 Ignition switch . page 5-2 Tilt wheel release lever page 3-57 Parking brake . page 5-5 BSM OFF switch . page 5-36 1-2 The equipment and installation position varies by vehicle Your Vehicle at a Glance Interior Overview Interior Equipment (View B) Audio control switches page 6-46 SRS air bags page 2-50 Cruise control switches page 5-19 Information display page 6-123 Climate control system page 6-2 Hazard warning flasher switch page 5-68 Audio system . page 6-17 Glove box page 6-128 Accessory socket . page 6-131 AT shift lever page 5-10 Seat warmer switches page 2-10 Rear window defroster switch . page 5-66 Phone button page 6-103 Hood release handle page 3-43 Coin box page 6-128 Navigation System (if equipped) Refer to the separate manual The equipment and installation position varies by vehicle 1-3 Your Vehicle at a Glance Interior Overview Interior Equipment (View C) Overhead lights page 6-121 SRS air bags page 2-50 Seat belt . page 2-18 Rear entertainment system . page 6-51 Center console . page 6-128 Remote fuel-filler lid release . page 3-42 Cup holders page 6-125 Sunvisor . page 6-120 Moonroof switches page 3-45 Overhead console page 6-127 Rearview mirror . page 3-58 Vanity mirror page 6-120 Front seat . page 2-2 Climate control system (Rear) . page 6-14 Second-row seat . page 2-11 Third-row seat . page 2-16 1-4 The equipment and installation position varies by vehicle Your Vehicle at a Glance Exterior Overview Front Hood page 3-43 Windshield wiper blades page 8-27 Moonroof . page 3-44 Door lock . page 3-26 Fuel-filler lid page 3-42 Tires . page 8-33 Light bulbs . page 8-37 The equipment and installation position varies by vehicle 1-5 Your Vehicle at a Glance Exterior Overview Rear Liftgate page 3-28 Rear wiper blade page 8-29 Rear window antenna page 6-17 Child safety lock page 3-28 Outside mirror page 3-57 Tires . page 8-33 Navigation System (if equipped) Refer to the separate manual Light bulbs . page 8-37 Rear view parking camera (if equipped) Refer to the separate manual 1-6 The equipment and installation position varies by vehicle 2 Essential Safety Equipment Use of safety equipment, including seats, seat belt system, child-restraint systems and SRS air bags. Seats . 2-2 Front Seats (Manually Operated Seats) . 2-2 Front Seats (Electrically Operated Seats) 2-5 Second-Row Seats . 2-11 Third-Row Seat . 2-16 Seat Belt Systems Seat Belt Precautions 3-Point Type Seat Belt Front Seat Belt Pretensioner and Load Limiting Systems . Center-Rear Position Seat Belt (Second-Row Seats) Seat Belt Extender . Seat Belt Warning Light/Beep Child Restraint Child Restraint Precautions . Installing Child-Restraint Systems LATCH Child-Restraint Systems SRS Air Bags . Supplemental Restraint System (SRS) Precautions Supplemental Restraint System Components . How the SRS Air Bags Work SRS Air Bag Deployment Criteria Limitations to SRS Air Bag Driver and Front Passenger Occupant Classification System . Monitoring and Maintenance 2-18 2-18 2-22 2-24 2-27 2-30 2-32 2-34 2-34 2-38 2-45 2-50 2-50 2-55 2-56 2-60 2-61 2-63 2-68 2-1 Essential Safety Equipment Seats Front Seats (Manually Operated Seats) WARNING Do not modify or replace the front seats: Modifying or replacing the front seats such as replacing the upholstery or loosening any bolts is dangerous. The front seats contain air bag components essential to the supplemental restraint system. Such modifications could damage the supplemental restraint system and result in serious injury. Consult an Authorized Mazda Dealer if there is any need to remove or reinstall the front seats. Do not drive with damaged front seats: Driving with damaged front seats is dangerous. A collision, even one not strong enough to inflate the air bags, could damage the front seats which contain essential air bag components. If there was a subsequent collision, an air bag may not deploy which could lead to injuries. Always have an Authorized Mazda Dealer inspect the front seats, front seat belt pretensioners and air bags after a collision. Make sure the adjustable components of a seat are locked in place: Adjustable seats and seatbacks that are not securely locked are dangerous. In a sudden stop or collision, the seat or seatback could move, causing injury. Make sure the adjustable components of the seat are locked in place by attempting to slide the seat forward and backward and rocking the seatback. qSeat Slide WARNING Adjust the driver seat only when the vehicle is stopped: Adjusting the driver’s seat while the vehicle is moving is dangerous. The driver could lose control of the vehicle and have an accident. To move a seat forward or backward, raise the lever and slide the seat to the desired position and release the lever. Make sure the lever returns to its original position and the seat is locked in place by attempting to push it forward and backward. 2-2 Essential Safety Equipment Seats qSeat Recline Do not drive with the seatback unlocked: The seatback plays an important role in your protection in a vehicle. Leaving the seatback unlocked is dangerous as it can allow passengers to be ejected or thrown around and baggage to strike occupants in a sudden stop or collision, resulting in severe injury. After adjusting the seatback at any time, even when there are no other passengers, rock the seatback to make sure it is locked in place. To change the seatback angle, lean forward slightly while raising the lever. Then lean back to the desired position and release the lever. WARNING Do not drive with the seats reclined: Sitting in a reclined position while the vehicle is moving is dangerous because you don’t get the full protection from seat belts. During sudden braking or a collision, you can slide under the lap belt and suffer serious internal injuries. For maximum protection, sit well back and upright. Always sit in a passenger seat properly with the seatback upright and feet on the floor: If your vehicle is equipped with front passenger seat weight sensors, sitting in the front passenger seat improperly out of position or with the seatback reclined too far while the vehicle is moving is dangerous as it can take off weight from the seat bottom and affect the weight determination of the front passenger sensing system. As a result the front passenger will not have the supplementary protection of the air bag and seat belt pretensioner, which could cause result in serious injury. Always sit upright against your seatback, with your feet on the floor. Make sure the lever returns to its original position and the seatback is locked in place by attempting to push it forward and backward. 2-3 Essential Safety Equipment Seats CAUTION When returning a rear-reclined seatback to its upright position, make sure you hold onto the seatback with your other hand while operating the lever. If the seatback is not supported, it will flip forward suddenly and could cause injury. qHead Restraint WARNING Always drive with the head restraints installed when seats are being used and make s …..
and information on how to display the ESN#. 75 Audio Operation Operating the In-Dash CD Changer Mazda CX-9 Folder search on-screen button Disc on-screen button Before Use Getting started Track up button 76 Routing Address Book Voice Navigation RDM-TMC Recognition Set Up Scan button on-screen button on-screen button Track down button Mazda CX-7 Track up button Audio Operation Navigation Set Up Track down button Scan button Disc on-screen button Folder search on-screen button on-screen button on-screen button n Inserting the CD The display must be open (lowered) to insert the CD. The CD must be label-side up when inserting. The auto-loading mechanism will set the CD and begin play. There will be a short lapse before play begins while the player reads the digital signals on the CD. Note “IN ” is displayed on the tray number for a CD that is inserted. n During CD playback The disc title, the track title, and the artist name will be displayed. n During MP3 CD playback The album title, the track title, the folder name, the file number, and the artist name will be displayed. Note The CD will begin playback automatically after insertion. A CD cannot be inserted while the display reads “WAIT “. n Normal insertion 1.Press the (LOAD/EJECT) button. 2.Press the on-screen button lightly. The display opens and “WAIT ” is displayed. 3.Lightly insert the CD after “IN ” is displayed. The CD will be inserted and played automatically after the display is closed. Note lA CD cannot be inserted while “WAIT ” is displayed. Wait until “IN ” is displayed. lThe CD loading operation cancels 15 seconds after “IN ” is displayed or if the (LOAD/ EJECT) button is pressed again. n Inserting Audio Operation CDs into desired tray number on-screen button lightly. 1.Press the (LOAD/EJECT) button. 2.Press the desired tray number, then press the The display opens and “WAIT ” is displayed. Note The CD loading operation cancels if no button is pressed for about 30 seconds after the desired tray number is pressed, or if the (LOAD/EJECT) button is pressed again. 3.Lightly insert the CD after “IN ” is displayed. The CD will be inserted and played automatically after the display is closed Note lThe CD loading operation cancels 15 seconds after the on-screen button is pressed or the (LOAD/EJECT) button is pressed again. lThe CD cannot be inserted to the desired tray number if it is already occupied. 77 n Multiple insertion 1.Press the (LOAD/EJECT) button. 2.Press the on-screen button for 1.5 seconds or more. The display opens and “WAIT ” is displayed. Before Use Getting started 3.Lightly insert the CD after “IN ” is displayed. 4.When “IN ” is displayed again, insert the next CD. Repeat this procedure for the number of CDs to be inserted (maximum of 6 including the CD in the tray). The CD will begin playback automatically after insertion and the display closes. 78 Routing Address Book Voice Navigation RDM-TMC Recognition Set Up Note The CD loading operation cancels 15 seconds after “IN ” is displayed, or the (LOAD/EJECT) button is pressed again. n Normal ejection 1.Press the (LOAD/EJECT) button. 2.Press the on-screen button lightly. 3.The CD ejects after the display is opened and the desired tray number flashes. 4.The display closes automatically after the ejection is fully completed. Note If the CD is not removed from the slot within 15 seconds, it will be re-inserted. When this happens, or if the (LOAD/EJECT) button is pressed again, the CD ejecting operation will be canceled. n Ejecting CDs from desired tray number on-screen button lightly. 1.Press the (LOAD/EJECT) button. 2.Press the desired CD tray number, then press Audio Operation Navigation Set Up Note The CD ejecting operation cancels if the on-screen button is not pressed for about 30 seconds after the desired tray number is pressed, or if the (LOAD/EJECT) button is pressed again. 3.The CD will be ejected automatically after the display is opened and the desired tray number flashes. Note lIf only one CD is inserted in the tray, the display opens and the CD is ejected without pressing on-screen button. lIf the CD is not removed from the slot within 15 seconds or if the (LOAD/EJECT) button is pressed, the CD ejecting operation will be canceled. 4.The display closes after the CD is ejected. n Multiple ejection 1.Press the (LOAD/EJECT) button. 2.Press the on-screen button for 1.5 seconds or more. The CD ejects after the display is opened and the desired tray number flashes 3.Pull out the CD. 4.The next CD will be ejected automatically. This operation repeats until all the CDs are taken out. Note If the CD is not removed from the slot within 15 seconds or if the (LOAD/EJECT) button is pressed, the CD ejecting operation will be canceled. n Playing Press the (CD) button to start play when a CD is in the unit. If there is no CD in the unit when the (CD) button is pressed, “NO DISC ” will flash on and off. The song information will be displayed during playback. Music CD Audio Operation MP3 CD 79 Note l ” – ” will be displayed for files without a file, track or other name input. lThis unit can read English (including numerals), French, and Spanish one-byte characters. lThe displayable number of characters on each title is a maximum of 64. Before Use Getting started (Music CDs) lAlthough textual information (Track/artist information) recorded to each track appears in the display, textual information (Album/artist information) recorded for the entire CD does not appear in the display. For details, refer to “CD-TEXT ” ( page 62). Select the on-screen button if the whole title cannot be displayed at one time. The screen changes to display the rest of the characters. n Fast-forward/Reverse 80 Routing Address Book Voice Navigation RDM-TMC Recognition Set Up Press the track up button ( is heard. Press the track down button ( is heard. n Track ) to advance through a track at high speed until a beep sound ) to reverse through a track at high speed until a beep sound search ) once to skip forward to the beginning of the next track. ) once to skip back to the beginning of the current track. ) during track search to skip back to the beginning of the Press the track up button ( Press the track down button ( Press the track down button ( previous track. n Disc search To change the disc, press any DISC on-screen button during playback. n Folder search (during MP3 CD playback) on-screen button, or select the on-screen Audio Operation Navigation Set Up To change to the previous folder, select the button to advance to the next folder. n Music scan This feature helps to find a program by playing about the first 10 seconds of each track. Press the (SCAN) button during play to start scan play operation (the track number will flash). Press the (SCAN) button once again to cancel scan play. Note If the unit is left in scan, normal play will resume where scan was selected. n Repeat play During music CD playback 1.Select the on-screen button during playback to play the current track repeatedly. 2.Select the button again to cancel the repeat play. During MP3 CD playback (Track repeat) 1.Select the on-screen button during playback to play the current track repeatedly. 2.To cancel the repeat play, select the button again after 3 seconds. (Folder repeat) 1.Select the on-screen button during playback, and then select the button again within 3 seconds to play the tracks in the current folder repeatedly. 2.Select the button again to cancel the repeat play. Random play Tracks are randomly selected and played. During music CD playback 1.Select the randomly. on-screen button during playback to play the tracks on the CD 2.Select the button again to cancel the random play. During MP3 CD playback (Folder random) 1.Select the randomly. on-screen button during playback to play the tracks in the folder 2.To cancel the random play, press the button again after 3 seconds. Audio Operation (CD random) 1.Select the on-screen button during playback, and then select the button again within 3 seconds to play the tracks on the CD randomly. 2.Select the button again to cancel the random play. n Audio sound adjustment Refer to “Power/Volume/Sound Controls “. tips for audio control switch VOICE switch Refer to “Voice Recognition ” ( page 50). n Operating 81 Adjusting the Volume To increase the volume, pull up the volume switch. To decrease the volume, press down the volume switch. Before Use Getting started 82 Routing Changing the Source Press the mode switch (MODE) to change the audio source (FM1 radio > FM2 radio > AM radio > CD changer > SIRIUS > cyclical). Address Book Voice Navigation RDM-TMC Recognition Set Up Seek Switch Audio Operation When listening to the radio Pull up or press down the seek switch, the radio switches to the next/previous stored station in the order that it was stored (1-6). Pull up or press down the seek switch for about 2 seconds until a beep sound is heard to seek all usable stations at a higher or lower frequency whether programmed or not. Navigation Set Up When playing a CD Pull up the seek switch to skip to the next track. Press down the seek switch to repeat the current track. n Safety Certification This CD player is made and tested to meet exacting safety standards. It meets FCC requirements and complies with safety performance standards of the U.S. Department of Health and Human Services. l This CD player should not be adjusted or repaired by anyone except qualified service personnel. If servicing is required, contact an Authorized Mazda Dealer. l Use of controls or adjustments or performance of procedures other than those specified herein may result in hazardous laser exposure. Never operate the CD player with the top case of the unit removed. l Changes or modifications not expressly approved by the party responsible for compliance could void the user’s authority to operate this equipment. Cautions Note For CD player section: This device complies with part 15 of the FCC Rules. Operation is subject to the following two conditions: (1) This device may not cause harmful interference, and (2) this device must accept any interference received, including interference that may cause undesired operation. Note This equipment has been tested and found to comply with the limits for a Class B digital device, pursuant to part 15 of the FCC Rules. These limits are designed to provide reasonable protection against harmful interference in a residential installation. This equipment generates, uses, and can radiate radio frequency energy and, if not installed and used in accordance with the instructions, may cause harmful interference to radio communications. However, there is no guarantee that interference will not occur in a particular installation. 83 Audio Operation MEMO Before Use Getting started Routing Address Book Voice Navigation RDM-TMC Recognition Set Up Audio Operation Navigation Set Up 84 Contents Rear View Monitor n Rear View Monitor l Rear View Monitor Cautions 86 l Rear View Parking Camera Location 86 l Switching to the Rear View Monitor Display 87 l Displayable Range on the Screen . 87 l Rear View Monitor Operation 88 l Variance Between Actual Road Conditions and Displayed Image 89 85 Rear View Monitor Rear View Monitor Rear View Monitor Cautions The rear view monitor is a visual assist system when reversing the vehicle that provides images from the rear of the vehicle. The rear view monitor is only a visual assist device when reversing the vehicle. The images on the screen may be different from the actual conditions. Always drive carefully confirming the safety of the rear and the surrounding conditions by looking directly with your eyes. Reversing the vehicle by only looking at the screen may cause an accident or a collision with an object. Warning Before Use Getting started 86 Routing Address Book Voice Navigation RDM-TMC Recognition Set Up Cautions l When the display is cold, images may course across the monitor or the screen and may be dimmer than usual, which could cause difficulty in confirming the surrounding conditions of the vehicle. Always drive carefully confirming the safety of the rear and the surrounding conditions by looking directly with your eyes. l Do not apply excessive force to the camera. The camera position and angle may deviate. l Do not disassemble, modify, or remove it as it may no longer be waterproof. l The camera cover is made of plastic. Do not apply degreasing agents, organic solvents, wax, or glass coating agents to the camera cover. If any are spilled on the cover, wipe off with a soft cloth immediately. l Do not rub the cover excessively, or polish it using an abrasive compound or a hard brush. The cover may be damaged affecting the image. Note lIf water, snow, or mud is stuck on the camera lens, wipe it off using a soft cloth. If it cannot be wiped off, use a mild detergent. lIf the camera temperature changes rapidly, such as by pouring hot water on it under cold temperature conditions, the rear view monitor may not operate correctly. Rear View Parking Camera Location Mazda CX-9 Rear View Parking Camera Rear View Monitor Mazda CX-7 Rear View Parking Camera Switching to the Rear View Monitor Display Shift the shift lever to R with the ignition switch in the ON position to switch the display to the rear view monitor display. Note When the shift lever is shifted from R to another shift lever position, the screen returns to the previous display. Displayable Range on the Screen The images on the screen may be different from the actual conditions. (Screen display) Both bumper ends are not displayed. (Actual view) Both bumper ends are not displayed. Object The figure is an example showing Mazda CX-9. Rear View Monitor Note lThe displayable range varies depending on the vehicle and road conditions. lThe displayable range is limited. Objects under the bumper or around the bumper ends cannot be displayed. lThe distance appearing in the displayed image is different from the actual distance because the rear view parking camera is equipped with a specific lens. lSome optionally installed vehicle accessories may be picked up by the camera. Do not install any optional parts that can interfere with the camera view, such as illuminating parts or parts made of reflective material. lIt may be difficult to see the display under the following conditions, however, it does not indicate a malfunction. · In darkened areas. · When the temperature around the lens is high/low. · When the camera is wet such as on a rainy day or during periods of high humidity. · When foreign material such as mud is stuck around the camera. · When the camera lens reflects sunlight or headlight beams. lIf the camera picks up a high-intensity light such as sunlight reflected off the vehicle body, a bright belt (light line) may appear on the display. (Smear phenomenon) 87 Rear View Monitor Operation The operation of the rear view monitor when reversing the vehicle varies depending on the traffic, road, and vehicle conditions. The amount of steering and the timing also varies depending on conditions, so confirm the surrounding conditions directly with your eyes and steer the vehicle in accordance with the conditions. Be well aware of the above cautions prior to using the rear view monitor. Before Use Getting started Note Images displayed on the navigation display from the rear view parking camera are reversed images (mirror images). (1) Shift the shift lever to R to switch the display to the rear view monitor display. (2) Confirming the surrounding conditions, reverse the vehicle. (Screen display) (Actual view) 88 Routing Address Book Voice Navigation RDM-TMC Recognition Set Up The figure is an example showing Mazda CX-9. (3) When the shift lever is shifted from R to another shift lever position, the screen returns to the previous display. Rear View Monitor Variance Between Actual Road Conditions and Displayed Image Some variance occurs between the actual road and the displayed road. Such variance in distance perspective could lead to an accident. Note the following conditions that may cause a variance in distance perspective. 1 When the vehicle is tilted due to the weight of passengers and load When the vehicle rear is lowered, the object displayed on the screen appears farther than the actual distance. Object Variance The figure is an example showing Mazda CX-9. 2 When there is a steep grade behind the vehicle When there is a steep upgrade (downgrade) behind the vehicle, the object displayed on the screen appears farther (downgrade: closer) than the actual distance. Appears farther than actual distance Appears closer than actual distance Rear View Monitor Object at actual position Object on screen Object on screen A: Distance between the vehicle and object displayed on the screen. Object at actual B: Actual distance between the vehicle and object. position The figure is an example showing Mazda CX-9. 89 MEMO Before Use Getting started Routing Address Book Voice Navigation RDM-TMC Recognition Set Up Rear View Monitor 90 Contents Bluetooth Hands-Free n Bluetooth Hands-Free (Mazda CX-9 only) l Screen display of Bluetooth Hands-Free information 92 91 Bluetooth Hands-Free (Mazda CX-9 only) Bluetooth Hands-Free Screen display of Bluetooth Hands-Free information If the Bluetooth Hands-Free is operated, information such as radio wave reception conditions of the Bluetooth Hands-Free are displayed on the screen. For details, refer to the “Bluetooth Hands-Free ” in the owner’s manual. Before Use Getting started 92 Routing Address Book Voice Navigation RDM-TMC Recognition Set Up Bluetooth Hands-Free information Bluetooth Hands-Free (Mazda CX-9 only) …
Wikipedia’s page for Mazda
Publisher: www.mazda.com


 2008 Mazda CX 9 Owners Manual, 2008 - 1 of 598
 2008 Mazda CX 9 Owners Manual, 2008 - 2 of 598
 2008 Mazda CX 9 Owners Manual, 2008 - 3 of 598
 2008 Mazda CX 9 Owners Manual, 2008 - 4 of 598
 2008 Mazda CX 9 Owners Manual, 2008 - 5 of 598
 2008 Mazda CX 9 Owners Manual, 2008 - 6 of 598
 2008 Mazda CX 9 Owners Manual, 2008 - 7 of 598
 2008 Mazda CX 9 Owners Manual, 2008 - 8 of 598
 2008 Mazda CX 9 Owners Manual, 2008 - 9 of 598
 2008 Mazda CX 9 Owners Manual, 2008 - 10 of 598